How to Assign Project to a User and Manage Allocations
Efficient management of project timesheet assignments and allocations is crucial for tracking project progress and optimizing resource utilization in the OfficeSeries application. This guide outlines the steps to view existing project assignments, allocate individual projects to users, and manage these allocations effectively.
Use this guide if you're trying to assign a project to a user, manage project allocations, or oversee project progress within the OfficeSeries application.
Who Can Benefit from This Guide
This guide is intended for:
- Project Managers: Responsible for overseeing project progress and resource allocation.
- Team Leads: In charge of managing team assignments and ensuring tasks are completed on time.
- Administrators: Users with administrative privileges who manage project settings and user permissions.
- HR Personnel: Involved in tracking employee time and project involvement for payroll and performance evaluations.
Prerequisites
Before proceeding, ensure you have administrative privileges within the OfficeSeries application. Familiarity with the OfficeSeries interface and project management concepts will also be beneficial.
How to Assign Project to a User and Manage Allocations
Follow these steps to assign a project to a user and manage project allocations effectively:
Step 1: Navigate to the project timesheet assignment management
Log in to the OfficeSeries application.
Navigate to "Projects" from the main menu and select the project you wish to manage.
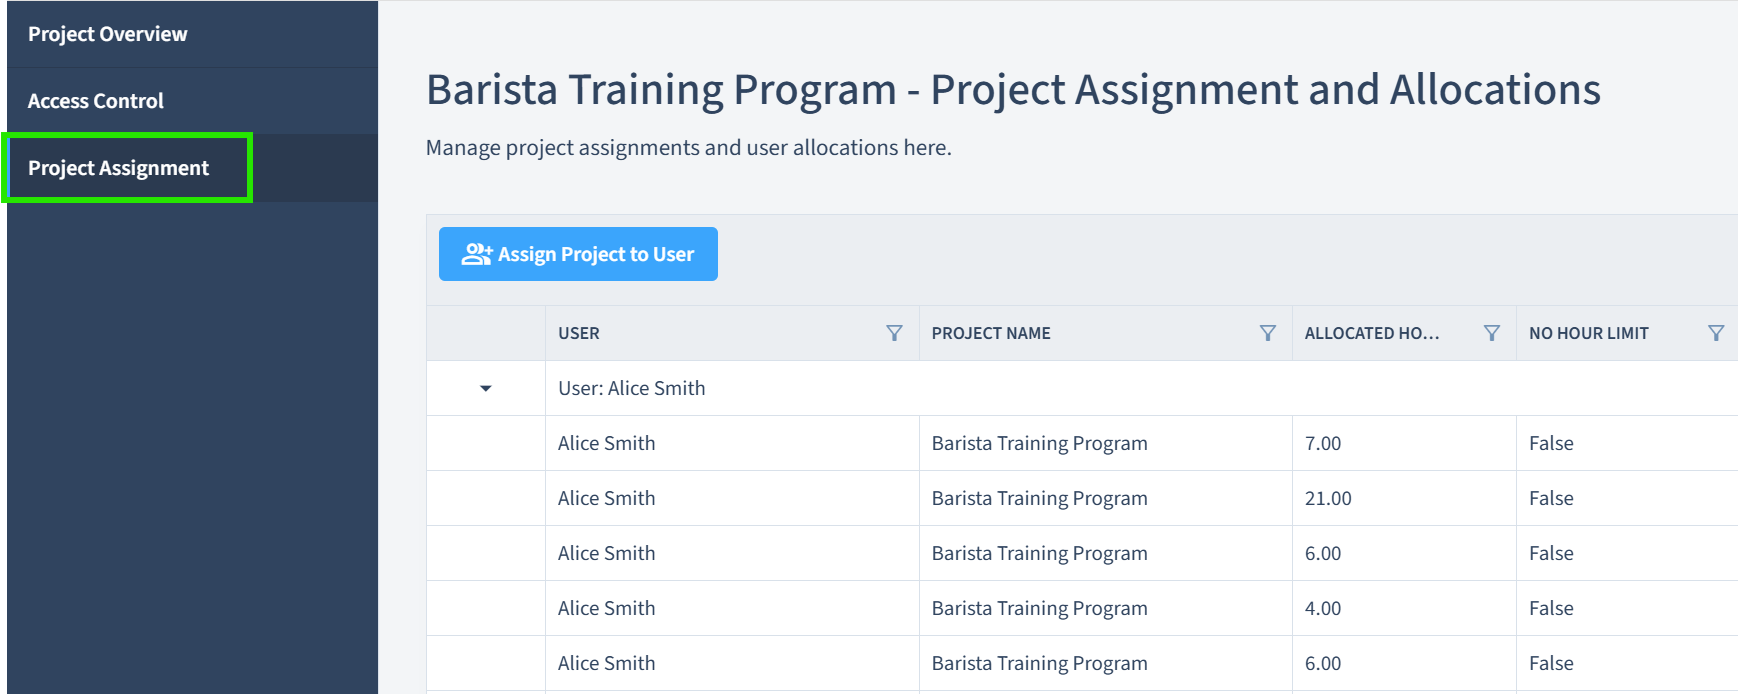
Select the "Project Assignment" from the secondary menu to open the project timesheet assignment and allocations page.

Here, you can view the existing project assignments and allocations for multiple users for the selected project.
Displayed information include the user name, project name, allocated hours, total allocated hours, assignment period, and first & last time entry date for each user.
Step 2: Select a user
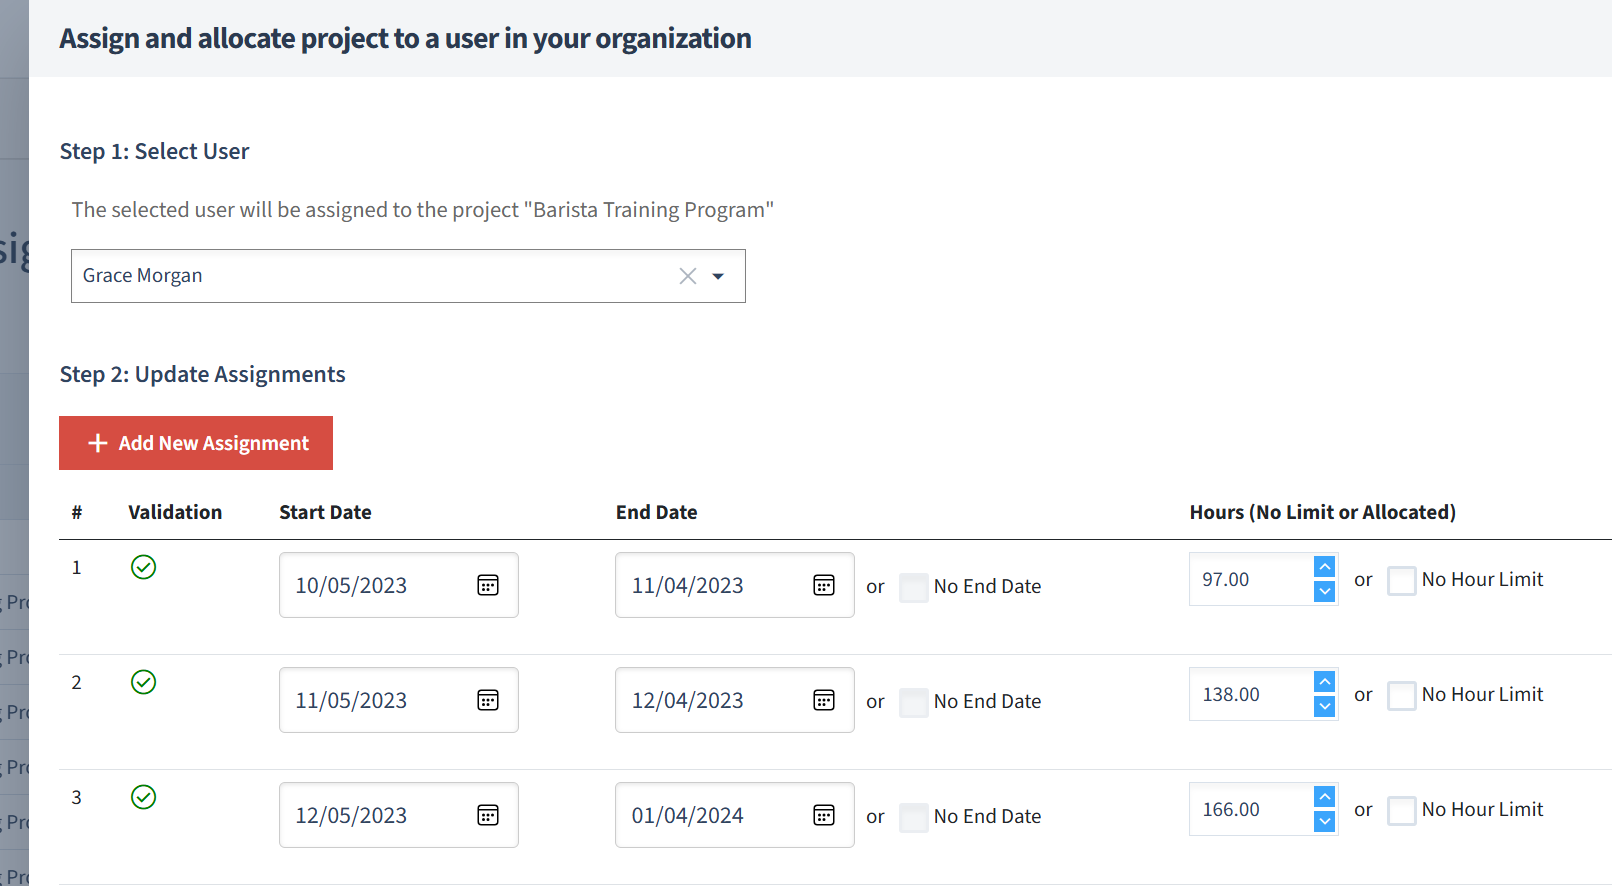
- To assign a project and allocate hours to a user, click the "Assign Project to User" button. This will open a side dialog.
- From the dialog, select a user from the dropdown list to assign the project to.
Step 3: View existing assignments
When a user is selected, all existing assignments for that user will be displayed in the project assignment table.

Details such as the validation status, start and end date, allocated hours, hours info (e.g., remaining, pending, and approved hours), timesheet info (e.g., dates for first & last entry), and actions are displayed in the table.
Step 4: Add a new assignment
To add a new assignment, click the "Add New Assignment" button.
A new row displaying "new" icon to indicate it's a new row, will be added at the bottom most part of the project assignment table.

Here, you can enter the assignment period and allocated hours for the project.
Specify the start and end date for the assignment period, or select 'No End Date' for an open-ended assignment. Remember that 'No End Date' option can only be used for project assignments with the latest start date.
Specify the allocated hours for the project, or select 'No Hour Limit' for an assignment without strict hour limits.
For detailed explanation of the assignment period and allocated hours, see Understanding Project Assignments Guide.
Step 5: Save the assignment
- Select "Save" to finalize the project allocation.
- Review the table to ensure the changes are reflected correctly.
Step 6: Manage existing assignments & allocations
- Existing allocations can be adjusted by re-opening the assignment dialog.
- You can modify the allocated hours, extend the assignment period, delete the assignment period, or reassign the project to a different user.
Step 7: Navigate and manage other projects
- To manage assignments for other projects, navigate back to the "Projects" section from the main menu.
- Select another project to manage its individual assignments and allocations.
What to Expect after a User is Assigned a Project
After assigning a project to a user, you can expect the following outcomes:
- The user will be responsible for completing tasks associated with the project.
- The user can start logging time against the project to track progress within the specified assignment period.
- If the project has a strict hour limit, the user must ensure they do not exceed the allocated hours without prior approval.
- The project manager or administrator can monitor the user's progress and time entries to ensure project milestones are met.
- The project manager or administrator may make necessary adjustments to project assignments or allocations based on project requirements or resource availability.
- If the project allocation is open-ended, the user can continue working on the project without strict date limits until the assignment is modified or removed.
Key Concepts
Understanding the key concepts of project assignments in OfficeSeries is essential for effective project management. These concepts include the following:
| Name | Description |
|---|---|
| Project and User Identification | Each project and user in OfficeSeries is uniquely identified, ensuring clear assignment tracking. |
| Hour Allocation | Projects are allocated a certain number of hours, indicating the expected effort required from the assigned user. |
| Hour and Time Flexibility | OfficeSeries supports flexible project assignments ('No Hour Limit' & 'No End Date'), allowing for open-ended projects and assignments without strict hour limits, accommodating varying project needs and workloads. |
| Compliance and Reporting | Users and managers must ensure that project assignments comply with organizational policies, with any discrepancies or additional hours requiring approval. |
To understand more about these key concepts, see Understanding Project Assignments Guide.
Summary
This guide assists in navigating the project assignment process within the OfficeSeries application. For further assistance or if you encounter any issues, consider reaching out to OfficeSeries support for help.